
When we started working on Cally’s Caves 3, it was clear that we needed to improve our tile system to give the game a better, more detailed look. In our previous two games, we used a really simple tile system consisting of 3 tile types; a “path” block, a “fill” block and a “boulder” block. We used the boulders as our “walls,” and flipped the path block for our ceilings.
It was a very simple system, and it worked for us at the time. A couple of months into Cally’s Caves 3 development, however, our artist 0HK0 suggested using a much more complex system to give our game some more visual flair. The suggested tile system would have two types of walls: environment walls and background walls. The environment walls tile set consists of 16 block types, and the background walls have 9. This dev diary will outline exactly how our tile system works, in the hopes that others may find it useful.
A Note About Tiles and Objects
We’ve heard that using objects for your environment tiles is a really horrible practice. Everyone says that in GameMaker, you should always use tiles for your environments, as they won’t run code and use up valuable CPU resources. While we can certainly see the value in using tiles, it should be noted that our tiles are objects, and we do run code in them. One of the main reasons we’ve done it this way, is that up to this point it has worked out. We have been able to maintain a good framerate on iOS, despite using objects. You could easily use this system with tiles though, the implementation would just be a little different.
The Main Tile Set
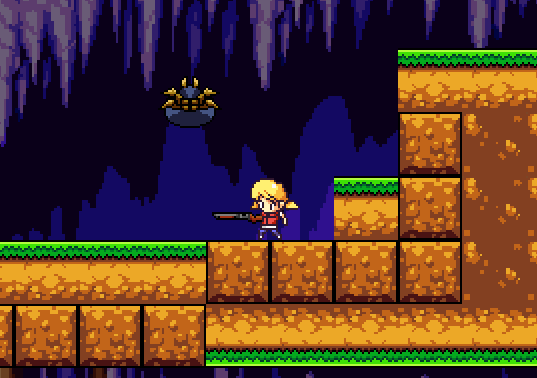
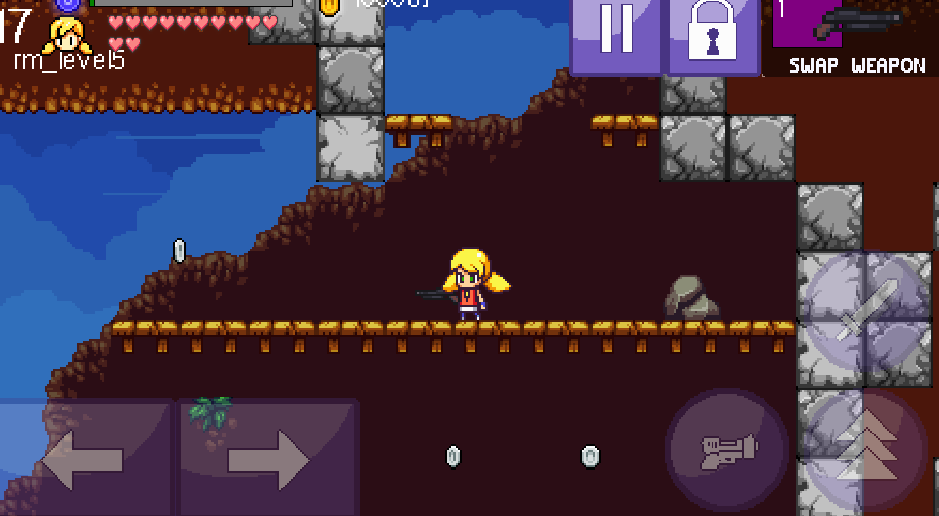
Pictured above, you can see our two depths of environment tiles. In the foreground, we have our regular tile system, which Cally can interact with. If she falls on a block, she stops falling. If she runs into a block horizontally, she stops moving. Behind that layer we have our “background” walls. These are there strictly for the look, and aren’t interacted with by the player. If you compare this screenshot to the image from Cally’s Caves 2, you can see that these tiles are much more detailed. The ceilings aren’t just flipped path blocks, and the tiles all have “hard” walls where they need to, depending on the situation. The way we achieved this is by using a 15-piece tile set, using the hard edges as our guide.

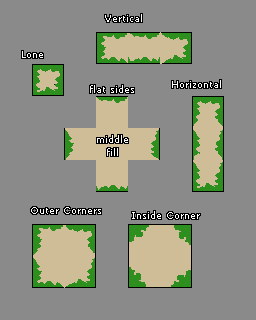
This is the guide 0HK0 based off of our collaborator Yal’s tile system for us to keep track of the different tile types. There is a tile for every possible situation a wall object can be in. To actually implement these tile systems in the game, we imported all of the tile sprites and then wrote some code for each tile to assign itself a sprite. Basically, when each wall object is created, it checks all of the spots around it to see if it is joined to any other tiles. If it is, it assigns itself the appropriate sprite for the situation. As an example, block 1 in the tile guide would be used when there is a block to the left of it, but the other three sides are empty.
The benefit of designing the tile object this way is that it lets us just paint wall objects freely in the Room Editor, using just one object. This saved us a lot of time where we would have been picking out individual tile objects to place. We use the tile detection code in the “Create” event of the wall object, and after that the objects don’t run any code so their impact on CPU resources is limited. (*Note: We also use deactivation/activation methods to not have every tile be active in every room at the same time).
Inner Corner Tiles
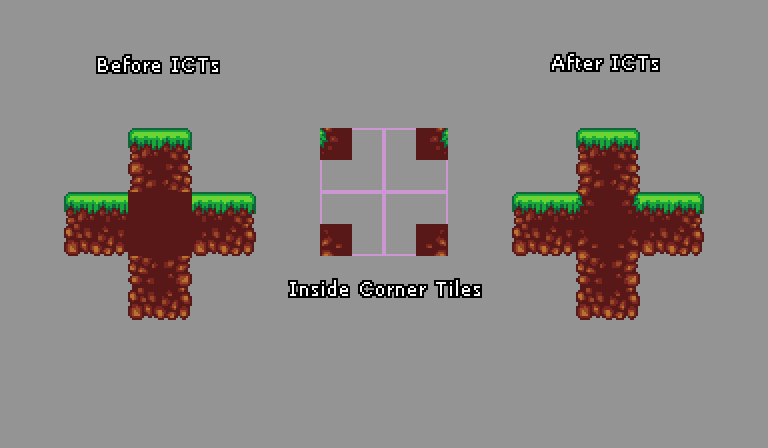
If you’ve followed 0HK0’s handy tile guide and implemented some objects in the room, you might notice that some of the blocks still have hard edges that don’t look perfect. Like this:

In theory, we could have made a tile set with blending to match all of these situations, however that would increase the number of tiles required exponentially. Instead of worrying about making dozens of tiles to blend in all of those situations, 0HK0 suggested using a set of 4 “Inner Corner Tiles,” which can be placed over the tile blocks and facilitate blending. This is the Inner Corner Tile guide 0HK0 made for us:
That brings our overall foreground tile sprite count to 19. Sure, it means a bit of extra work because we need to manually place the inner corner tiles, but for the difference it makes in the look of the game, it’s worth it.

Background Walls
We wanted to add background tiles to Cally’s Caves 3 to add an extra layer of visual depth, and give something for some of our decorations to be placed on. Think of the walls you can run in front of in Mario 3 or Super Mario World – that’s what we wanted.
In order to achieve this, we used a 9-tile system that is based around diagonal edges. These tiles can either be inside background walls, or the edges of background walls, as this image guide from 0HK0 demonstrates:

Using the same method of detecting what other background wall objects are around our background wall tile, we can again tie all of these sprites to a single object, and paint it freely in the room editor. The 9-tile system for background walls has a few more limitations to how it can be used. For example, each background wall needs to be at least two blocks wide or two blocks tall, but for the added effect we get from it, it was well worth it.
Using our 15-piece wall tileset, with 4 inner corner tiles, and our 9 tile background wall tileset, we hope Cally’s Caves 3 will have a much more detailed and intricate look than its predecessors. Implementing how the tile systems work took a while but after we had it set up it gave us a lot of flexibility when it came to level design. Without the great work of our artist, 0HK0, we never would have thought of doing our tiles this way, and we hope by posting this dev diary we can help some other indie developers out there.
If you have any questions, or want to tell us how horrible using objects instead of tiles is, hit us up in the comments.

Quite interesting! Thanks for sharing your experiences, i love your game.
Thank you so much for the support